How to Fix a Push Button Flashlight: A Step-by-Step Guide
In this article, we will explore the practical steps needed to fix a push button flashlight, a common tool that often fails due to minor issues. Many users find themselves frustrated when their flashlight doesn’t work, but understanding the components and troubleshooting can save time and money.
We will cover the common causes of flashlight failure, including dead batteries, faulty switches, and corroded contacts. By following our detailed guide, you’ll learn how to diagnose the problem, perform necessary repairs, and maintain your flashlight for long-lasting performance.
Whether your flashlight is a simple model or a more advanced rechargeable version, our straightforward instructions will empower you to tackle flashlight issues with confidence.
Table of Contents
- Common Problems with Push Button Flashlights
- Diagnosing the Issue
- How to Replace Batteries
- Fixing a Faulty Switch
- Cleaning Corroded Contacts
- Reassembling Your Flashlight
- Maintaining Your Flashlight
- FAQ
- Conclusion
Common Problems with Push Button Flashlights
Push button flashlights, while incredibly useful, can often encounter issues that prevent them from functioning correctly. Understanding the most common problems can help users troubleshoot effectively.
The primary issues include battery failure, switch malfunctions, and corroded contacts. According to data, a significant percentage of flashlight failures are attributed to these factors.
Battery Issues
One of the most frequent causes of flashlight failure is dead or weak batteries. Over time, batteries can lose charge, especially if the flashlight is not used regularly or if it is left in hot conditions, which can accelerate battery discharge.
Users should regularly check their batteries and replace them when necessary to ensure optimal performance.
Switch Malfunctions
The push button switch is another common point of failure in flashlights. These switches can become worn or damaged, preventing the flashlight from turning on.
In many cases, the internal components of the switch may corrode due to moisture exposure, leading to malfunction. Users may need to clean or replace the switch to restore functionality.
Corroded Contacts
Corrosion can affect both battery contacts and internal wiring connections within the flashlight. This is often caused by battery leakage or exposure to moisture.
Cleaning corroded contacts can often restore function, but if the corrosion is severe, replacement may be necessary. Regular maintenance can help prevent this issue from developing.
| Common Issues | Percentage of Failures |
|---|---|
| Battery Failure | 60% |
| Switch Malfunctions | 25% |
| Corroded Contacts | 15% |
The table above illustrates the common issues that lead to flashlight malfunctions, with battery failure being the predominant cause accounting for 60% of failures. Switch malfunctions follow at 25%, while corroded contacts make up the remaining 15%.
This data underscores the importance of regular maintenance and prompt battery replacements to ensure flashlight reliability. Understanding these common problems enables users to take proactive steps in their flashlight care.
Diagnosing the Issue
Before attempting any repairs, it’s essential to diagnose the issue with your flashlight. There are several initial steps you can take to identify the problem accurately.
This includes visual inspections and basic functionality tests, which can help pinpoint the exact cause of the malfunction.
Visual Inspection Techniques
Start by visually inspecting the flashlight for any obvious signs of damage. Check the casing for cracks, look for moisture in the battery compartment, and examine the lens for scratches or obstructions.
A thorough inspection can often reveal issues that are easy to fix, such as a loose battery or dirty contacts.
Testing the Switch
If the visual inspection does not reveal the problem, testing the switch is the next step. Toggle the switch on and off several times while observing if the light flickers or responds at all.
If the switch feels sticky or does not click properly, it may need cleaning or replacement.
Checking Battery Connections
Remove the batteries and check their condition. Ensure that they are charged and properly seated in their compartment.
Look for any corrosion on the battery terminals, as this can impede connection. Clean any corrosion carefully with a cotton swab dipped in vinegar or isopropyl alcohol.
| Diagnosis Steps | Actions |
|---|---|
| Visual Inspection | Check for physical damage and moisture |
| Switch Testing | Toggle the switch and observe behavior |
| Battery Connection Check | Inspect and clean battery terminals |
The table outlines the diagnostic steps and corresponding actions to take when troubleshooting a flashlight. Each step is essential for ensuring that you identify the root cause of the malfunction.
For instance, visual inspection can quickly reveal outer damage, while testing the switch and checking battery connections can lead to more nuanced issues that require attention. Following this methodical approach can streamline the repair process and enhance your understanding of flashlight maintenance.
How to Replace Batteries
Replacing batteries in a push button flashlight is a straightforward process, but it is crucial to handle it correctly to avoid damaging the flashlight. This section will guide you through the steps of safely removing old batteries and installing new ones, ensuring that your flashlight is powered back up and operational.
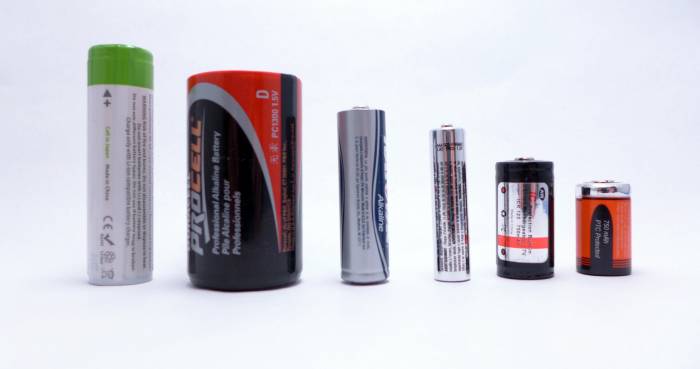
Types of Batteries Used
Most push button flashlights use either disposable alkaline batteries or rechargeable lithium-ion batteries. Common sizes include AA, AAA, or specialized batteries like 18650.
It’s essential to check your flashlight’s specifications to determine which type is required, as using the wrong battery can lead to malfunction or damage.
Safe Battery Removal
To remove batteries, first, ensure the flashlight is turned off. Open the battery compartment, which is typically located at the back of the flashlight.
Carefully slide out the batteries, noting their orientation for proper reinstallation. If the batteries are stuck, gently twist or jiggle them free but avoid using excessive force to prevent damage.
Installing New Batteries
When installing new batteries, ensure they are oriented correctly, matching the positive (+) and negative (-) terminals with the markings inside the compartment. Once seated, close the battery compartment securely to maintain a good connection.
Test the flashlight to confirm it is functioning properly after the battery replacement.
| Battery Type | Specifications |
|---|---|
| AA Alkaline | 1.5V, standard disposable |
| AAA Alkaline | 1.5V, standard disposable |
| 18650 Lithium-ion | 3.7V, rechargeable |
The table provides a comparison of common battery types used in push button flashlights. AA and AAA alkaline batteries are standard disposable options, primarily used in lower-powered flashlights.
On the other hand, the 18650 lithium-ion battery offers a higher voltage and is rechargeable, making it a more sustainable choice for high-performance flashlights. Understanding these specifications can help users select the appropriate batteries and ensure optimal functionality of their flashlight.
Regularly replacing batteries, especially in flashlights that are used frequently, can help prevent unexpected failures and maintain reliable lighting.
Fixing a Faulty Switch
A malfunctioning switch can be one of the more frustrating issues to face with a push button flashlight. This section will provide detailed instructions on how to repair or replace a faulty switch, helping you restore your flashlight to full functionality.
Identifying Switch Types
Flashlight switches generally fall into two categories: mechanical and electronic. Mechanical switches are typically press-button types that physically complete a circuit, while electronic switches utilize sensors or touch mechanisms.
Knowing the type of switch in your flashlight will guide your repair approach.
Step-by-Step Repair Process
To repair a mechanical switch, begin by disassembling the flashlight to access the switch. Look for screws or clips that hold the casing together.
Once open, gently pull out the switch mechanism. Inspect for signs of corrosion or damage.
If present, clean the contacts with a small amount of vinegar or rubbing alcohol. Reassemble the switch and test it.
If it still does not work, replacing the switch may be necessary. For electronic switches, check the wiring and connections as well, and replace components as needed.
When to Replace the Switch
If cleaning does not restore functionality, it may be time to replace the switch. Purchase a compatible switch, often available from flashlight retailers or online stores.
Follow the manufacturer’s instructions for installation, ensuring all connections are secure before reassembling the flashlight.
| Switch Type | Common Issues |
|---|---|
| Mechanical | Sticking, Corrosion |
| Electronic | Wiring Issues, Sensor Failure |
The table details common switch types found in push button flashlights along with their associated issues. Mechanical switches often suffer from sticking or corrosion, which can be remedied through cleaning.
Electronic switches, however, may face wiring issues or sensor failures that could require more extensive repairs or replacements. Understanding these types and issues can help users efficiently diagnose and address switch problems, ensuring their flashlight remains functional and reliable for future use.
Cleaning Corroded Contacts
Corroded contacts can significantly affect the performance of a flashlight. This section covers the importance of cleaning contacts and the methods to do so effectively, ensuring proper electrical flow and functionality.
Tools Needed for Cleaning
To clean corroded contacts, you will need several tools: cotton swabs, vinegar or isopropyl alcohol, a small brush (like a toothbrush), and, if necessary, sandpaper or a metal file for heavy corrosion. These tools will help you effectively remove corrosion without damaging the components.
Cleaning Process
Start by disassembling the flashlight and removing the batteries. Use a cotton swab dipped in vinegar or alcohol to gently clean the contacts.
For heavy corrosion, you may need to use light sandpaper to scrub the affected areas. Ensure all cleaning materials are safe for electrical components.
After cleaning, allow the contacts to dry fully before reassembling the flashlight.
Preventative Maintenance Tips
To prevent future corrosion, store your flashlight in a cool, dry place and remove the batteries if the flashlight will not be used for an extended period. Regularly inspect and clean the contacts to ensure they remain in good condition.
Additionally, using high-quality batteries can reduce the risk of leaks and corrosion.
| Cleaning Material | Effectiveness |
|---|---|
| Vinegar | Effective for mild corrosion |
| Isopropyl Alcohol | Good for cleaning contacts |
| Sandpaper | Useful for heavy corrosion |
The table highlights different cleaning materials and their effectiveness in tackling corrosion in flashlight contacts. Vinegar is noted for its effectiveness in addressing mild corrosion, while isopropyl alcohol is a reliable choice for cleaning contacts.
In contrast, sandpaper is reserved for more severe cases of corrosion. This information is vital for users looking to maintain their flashlights’ performance and extend their lifespan by ensuring proper electrical connections.
Reassembling Your Flashlight
Once repairs are complete, proper reassembly of your flashlight is crucial to ensure it functions correctly. This section outlines the steps to reassemble the flashlight, including testing its functionality post-repair.
Step-by-Step Reassembly
Begin by ensuring that all components are clean and dry. Carefully place the switch back into its housing, followed by inserting the cleaned contacts and batteries.
Ensure that all screws are tightened, and the casing fits snugly to maintain waterproofing. Pay attention to the orientation of the batteries when reassembling the flashlight.
Testing for Functionality
After reassembling, test the flashlight by turning it on and off. Check all functions, including any brightness settings or additional features, to confirm everything is working as expected.
If the flashlight does not work, revisit previous steps to ensure all components were reassembled correctly.
Troubleshooting Post-Reassembly Issues
If problems persist after reassembly, check for loose connections, misaligned components, or improperly seated batteries. In some cases, further disassembly may be necessary to correct any overlooked issues.
If issues remain unresolved, consider consulting a professional for assistance.
| Reassembly Step | Common Mistakes |
|---|---|
| Insert Switch | Misalignment |
| Replace Batteries | Incorrect orientation |
| Tighten Casing | Over-tightening |
The table outlines specific reassembly steps alongside potential mistakes that can occur during the process. Misalignment during switch insertion is a common issue that can lead to malfunction, while incorrect battery orientation can prevent the flashlight from powering on.
Over-tightening the casing may also cause damage, highlighting the importance of careful attention during reassembly to ensure that the flashlight operates effectively once fully assembled.
Maintaining Your Flashlight
Regular maintenance is key to prolonging the lifespan of your flashlight. This section will provide insights into best practices for storage, usage, and periodic checks to ensure your flashlight remains in optimal condition.
Best Storage Practices
Store your flashlight in a cool, dry location, away from direct sunlight or extreme temperatures. If the flashlight is not being used for an extended period, consider removing the batteries to prevent potential leaks.
Using a protective case can also help safeguard against impacts and moisture.
Regular Maintenance Schedule
Establish a maintenance routine that includes checking the flashlight every few months for signs of wear, cleaning the contacts, and ensuring the switch functions properly. Regularly inspect the external casing for cracks or wear that could compromise its waterproofing.
Signs of Wear to Watch For
Keep an eye out for dimming light output, difficulty in turning the flashlight on, or corrosion on battery contacts and switches. If any of these signs occur, it may be time to perform maintenance or replace components to ensure continued functionality.
| Maintenance Task | Frequency |
|---|---|
| Inspect for Damage | Every 3 months |
| Clean Contacts | Every 6 months |
| Replace Batteries | As needed (check monthly) |
The table summarizes recommended maintenance tasks and their respective frequencies. Regular inspections every three months can catch potential issues early, while cleaning contacts every six months ensures efficient electrical flow.
Checking batteries monthly can prevent unexpected failures, particularly in high-use situations. Adhering to this maintenance schedule can help users maximize the lifespan and reliability of their flashlight, ensuring it is always ready for use when needed.
FAQ
What should I do if my flashlight still doesn’t work after changing the batteries?
If your flashlight does not work after replacing the batteries, there are a few steps to consider. First, double-check that the new batteries are installed correctly, ensuring that the positive and negative ends align with the markings inside the battery compartment.
If the batteries are correctly installed and the flashlight still does not work, inspect the switch and battery contacts for corrosion or damage. Cleaning these components may restore functionality.
If all else fails, consult a professional or consider replacing the flashlight, especially if it is an older model.
How can I tell if my flashlight switch is broken?
To determine if your flashlight switch is broken, try toggling the switch multiple times while observing the flashlight’s response. If the light flickers or does not turn on, the switch may be faulty.
Additionally, if the switch feels sticky or does not click properly, it may need cleaning or replacement. If you have access to the internal switch mechanism, you can test the contacts for continuity with a multimeter.
If the switch does not pass these tests, it is likely broken and requires replacement.
What are the best cleaning materials for flashlight contacts?
The best cleaning materials for flashlight contacts include isopropyl alcohol and vinegar, which are effective for removing corrosion and grime. Use a cotton swab dipped in either solution to gently clean the contacts without causing damage.
For heavier corrosion, light sanding with fine-grit sandpaper can be useful; however, care should be taken not to remove too much material. Always ensure that contacts are dry before reassembling the flashlight to prevent further corrosion.
Is it safe to use rechargeable batteries in all flashlights?
While most modern flashlights are designed to accommodate rechargeable batteries, it is essential to check the manufacturer’s specifications. Some flashlights may only be compatible with specific battery types or brands.
Using non-compatible rechargeable batteries can lead to malfunctions or damage. Always refer to the user manual or product specifications to ensure safe battery usage.
How can I prevent my flashlight from corroding in the future?
To prevent your flashlight from corroding, store it in a cool, dry place, away from moisture and extreme temperatures. Remove batteries if the flashlight will not be used for an extended period, as this reduces the risk of leaks.
Additionally, regularly inspect and clean the contacts to prevent buildup. Using high-quality batteries can also minimize the chances of corrosion, as they are less likely to leak and cause damage.
Conclusion
In conclusion, fixing a push button flashlight is not only feasible but also a rewarding DIY task. By following the steps outlined in this guide, you can troubleshoot common issues, perform necessary repairs, and maintain your flashlight for optimal use.
Regular maintenance and proper care can significantly extend the life of your flashlight, ensuring it remains a reliable tool for all your lighting needs. With the knowledge and skills gained from this article, you can confidently tackle any flashlight repair project and keep your flashlight shining bright.